Pulses Series: Mung Bean Dal
This is the first in a series of easy, cheap eats using different types of pulses (dry legumes) and lentils. It’s also part of my drive to lower my meat consumption for the following reasons in order of priority: caloric intake, cost, environmental impacts, convenience of storage & handling, renewed interest in the cuisines from whence I came.
Note:
I bought a pressure cooker. I’d highly recommend a pressure vessel of sorts. It massively reduces cooking times, allows you to conveniently store bulk ingredients in dry form without the need for presoaking and develops more intense flavours in a shorter period of time.
If you’re scared of pressurized vessels, that’s completely rational and healthy. I am too. Never underestimate the effects of pressure, but in familiarizing yourself with how vessels work, you’ll go a long way into making sure you don’t make silly mistakes. One thing you should know is that newer devices often have a host of safety features built in and one rule by far almost guarantees safety when using them:
- Ensure vessel is depressurized before trying to open. Almost all devices I’ve seen have a mechanical popup tab that is raised when the vessel is pressurized and fals down satisfyingly at atmospheric pressure. This is a great failsafe that doesn’t depend on software / sensors or intuitions. I’m extremely frugal and practical in the kitchen – yes, the whole act of using wine bottles as rolling pins, kneading dough in the rare instances I make it at home and grinding spices manually – but if something has a great ROI, I’m sold. For about CAD $40, you can get yourself a basic whistletop pressure cooker and for just under CAD $100, a full whack electronic one with multiple functions and timers on it. If you don’t have one, that’s fine, you can do everything below but just allocate more time. I can’t give you a time estimate so you’ll have to experiment for yourselves ;)
Recipe
List of ingredients
- 2 cups mung beans (dry, whole – important – mung beans come split with the husks removed too. This will give a different texture)
- 6 cups of water
- 1 clove garlic
- Half a large onion (optional)
- 1 tomato or a handful of cherry tomatoes
- A teaspoon each of turmeric, cumin, salt and any kind of chilli powder
- Coriander powder and pepper to taste (optional)
Process
-
Measure out the mung beans in whatever cup you have.The whole recipe can be scaled easily to this amount, although if you’re making 1 cup, err on the side of more of the other ingredients and past 4 cups, err on the side of lowering the amount of the other ingredients by a bit. The 2 cups used in this recipe will approximately double in size and give you about 3-4 servings. In Canada, most of our dried legumes come to us clean enough so washing is not really necessary, but it wouldn’t hurt I suppose. Personally, I feel like not washing them also gives me a bit of starch left hanging that will bring the broth together quite nicely. You do you though. Throw in the beans into your cooking vessel.
Why dry legumes and not the ready to eat cans of beans? A couple of reasons really:
- Per gram, those cans, while convenient, cost more than a bag of dried goods. The aquafaba in them adds up to their mass and while it can be useful for other recipies, here it’s just a waste.
- You can buy in bulk will less packaging per gram and so fewer trips to the stores / more efficient storage at home.
- You’re just getting the raw product for you to cook. It’s not been through some big vat somewhere and then stuffed with any other preservatives.
- If you have a pressure cooker, time to soak or time to boil them then there’s absolutely no benefit to the canned stuff.
-
Measure 6 cups of water (or the adjusted ratio you need). This will yield a rich, soupy result. If you serve this with a starch like rice, it will be easy enough to coat every grain and still remain juicy. Dial down the amount of water to get more of a thick curry texture. Dial up the water to get a thin soup – particularly useful if you’re fighting a flu or toothache and need something easy to slurp.
-
Peel the clove of garlic and bang down a knife on it to crush it’s structure but not really chop it. Throw this thing in. Dice your onion into thumbnail sized chunks and throw those in too.
-
Dice the tomatoes finer than the onion or if you have a food processor, pulse them for a bit. Pressure cooking these will soften them a lot but we’re just trying to release as much juice as possible to go into the broth. A handy tip is to use cherry tomatoes instead of regular ones for more flavour. Off-season tomatoes in most supermarkets can be really bland and practicall useless for broths. This is the real reason you see chefs put in a squeeze of concentrated tomato paste alongside their real tomatoes. If you happen to visit an area where someone has grown their own tomatoes or countries where tomatoes have not been bred to be massive waterlogged rags, it will be no surprise that their flavour profile will carry the dish just fine. So yeah, if you get some rare heirlooms, use them. Otherwise, good ol’ cherry tomato umami bombs are perfect. Throw these, skin, juice, seeds and all into the mix.
-
Add in your spices and if you have a penchant for spiciness, by all means chop up a birds eye or green chilli and throw it in. I find the tomato gives me just enough acidity but you could add in a squeeze of lemon or tablespoon of vinegar if you like more tang. Don’t worry about the sharp smell of vinegar, time and heat will sort it all out. In some parts of Gujarat, where this dish originates from, people add sugar and go for a sweeter result. I personally prefer the savoury version without it.
-
Give it a gentle stir and distribute the ingredients. It’ll sound weird with the dried beans clanking against each other. It’s perfectly safe to taste too, although there’s not much you’ll gain from it. I’d recommend paying careful attention to the end result and proportioning your spices accordingly the next time. Seal the vessel and let it go for about 15 min on high pressure.
-
Release the pressure once done and have a taste! You can serve this on rice, roti, eat it on it’s own or even add thick yoghurt on top. Options galore! I often let it cool and store these portions to be used over the span of a week. You’ll start to see water separate in the fridge but it’s nothing that can’t be solved by stirring and warming it up.
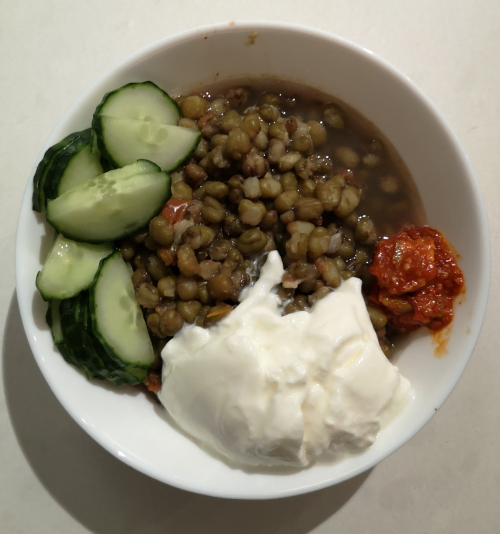
Mung dal with sliced cucumber, mango pickle and a dollop of yoghourt